How To Create Microsoft Word Labels
Using Free Avery Label Download
I was at a holiday party recently and listened to my friend tell her woe-is-me story about how she wasted half her Saturday morning trying to print address labels for her holiday cards.
This page about how to create Microsoft Word labels was inspired by her. I felt her pain because I have struggled with creating my own labels several times in the past, but once I found the free Avery label download, this job could not be easier.

Steps To Create Microsoft Word Labels
Before you watch me create the labels in the video below, an overview might be helpful.
First, you need 3 programs to do this job:
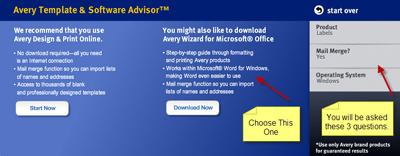
- Avery Label Download - Go to this link and look for the Avery Wizard for Microsoft Office (see image above). You will first be asked a couple questions to make sure they give you the correct download. Answer "labels" for a "mail merge" and PC or MAC when asked what you are looking for.
- Microsoft Excel Address File - All addresses must be in a spreadsheet to use the free Avery labels software. I find it easiest to have six columns of data in this order: First Name, Last Name, Address, City, State, Zip.
- Microsoft Word - You do not have to even open this program as the Avery labels program will do it for you. I'll show you how in the video.
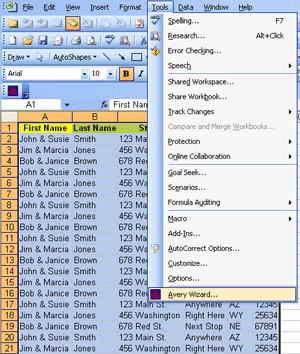
Second, open your Excel address spreadsheet. Select all the data and then open the Tools menu. If you download the Avery labels software properly, you should see it as a choice at the bottom as shown in this image.
Third, with the Avery dialog box open, follow these steps:
- On the Welcome To The Avery Wizard screen, choose Next.
- Select your Avery product by number which can be found on the front of every box (ex. 5351) then choose Next.
- Select an Avery template to customize. I choose the blank one but you can choose to customize another if you wish.
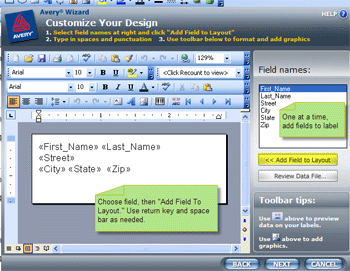
- Customize your design. Here's where you place each field (first name, last name...) on the labels. In my case I only want words, no clipart, so one by one I select each field and choose "Add Field To Layout." Use return key and space bar as needed. Hit Next.
- Print Preview and Finish. Here I choose "Fill Across", preview the labels if I want to and "Finish."
Finally, the Avery software opens Microsoft Word where you can print your labels and save the file. All printers are different but most of them require you to place your label stock face down in order the get them to print on the correct side.
Tip For Cut Off Labels - When you go to print your labels, always print preview in Microsoft Word first and use regular paper the first time you print so that you do not waste your label stock. I can tell you that even using the Avery software, I sometimes have trouble getting the margins right so portions of the labels get cut off.
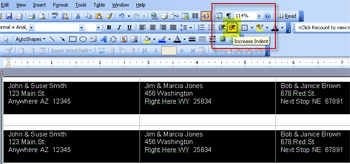
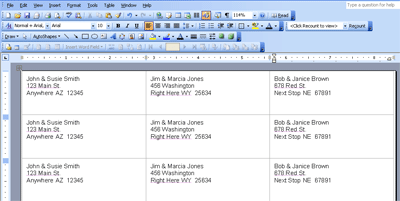
I found a solution that you may want to try if you have trouble with the margins. Once the labels open in Microsoft Word, hit Print Preview and see if any portion of the labels are cut off. In my case, the left margin is usually the problem. I fix this by first selecting all the labels in Microsoft Word (choose "Select All" from the Edit menu).
Then, as the image above shows, I click on "Increase Indent" button in Microsoft Word to move the label text over the the right. This usually solves the problem.
Watch Me Create Microsoft Word Labels
Now that you understand how to create Microsoft Word labels at a high level, it is time to watch me do it! If you would also like to learn how to create invitations in Microsoft Powerpoint, watch that video here.


Thoughts? Questions? Opinions?
Have your say about what you just read! Leave me a comment in the box below.