How To Make Your Own Wine Labels
Learn To Different Ways
Option 1: Make Wine Labels At Home
Two Ways To Learn--Video or Read
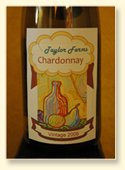
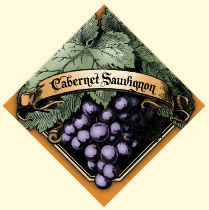
Making your own wine labels is easy to do and quite inexpensive (about 35 cents per label, depending on type of stock you buy). I'll explain how I made the one shown here using:
- My own graphics software (Microsoft Powerpoint)
- Full sheet label stock
- A color printer
- A paper cutter and
- Krylon Preserve It Spray
The goal of this project is to end up with 4 wine labels per 8-1/2 x 11 sheet. Each label will be no higher than 4 inches and no wider than 3 inches. This size will work for most bottles.
The reason you want to limit the size of the wine label is to avoid hitting the curvature of the bottle at the top and interfering with label adhesion.
You can learn to make your own wine labels by either watching a video or by reading instructions.
Learn By Watching A Video
Grab a cup of coffee and watch me make wine labels in this 10 minute video. See multiple examples to give you some ideas.
Learn By Reading Instructions
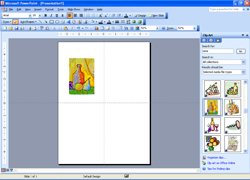
Open Microsoft Powerpoint and create a new document, portrait orientation.
Remember, each sheet will hold 4 labels. In order to help you visually divide the sheet into 4 quadrants choose View then Grids and Guides then Display Drawing Guides on Screen. Grid lines will appear exactly in the middle in both directions. They will not show up on the prints.
Let's create one label in the upper left quadrant then we'll copy and paste it into the other quadrants. In the example above, I used 1 clipart image, 5 shapes and 3 text boxes.
For the clipart: Choose Insert-Picture-Clipart. A dialog window will open to the right. In the Search For box, input the kind of clipart you want to use.
In the label above, I found the clipart under Wine. Click on the image of choice and it will appear in your newly created document. Use the sizing boxes to reduce the size of the image so it will fit nicely into the upper left quadrant.
To create shapes: Choose Insert-Picture-Autoshapes. For this particular label project, the banner can be found under Stars and Banners and the cloud around the upper text boxes is under More Autoshapes.
Click on the shape of choice and it will appear in your document. You can size it just like you did the clipart. You can also use the green circular arrow to rotate the shape completely which is what I did for the bottom banners. Use the Fill Color and Line Color buttons on the Drawing Toolbar to change fill and border colors.
To create text boxes: Also on the Drawing Toolbar is the Text Box button. Click on it and then hold down your mouse button and draw a box. Start typing and the box will fill with text. You can size the box, fill it will color and change the font (Format-Font). I suggest using separate text boxes for each area of text as it is easier to format and position the text.
Two Important Powerpoint Functions
- Layering Most graphics programs work with a layering function where each object is on its own layer. In Microsoft Powerpoint, think of the layers as a stack of transparencies.
The object on the transparency at the top of the stack will be completely visible but the objects on some of the transparencies underneath may be all or partially hidden.
If you can not see all or parts of an object (a piece of clipart, an autoshape...), you will need to rearrange the order of the layers. To further explain what I mean, look at the label I created. I moved the terra cotta colored banner at the top of the label further down in the stack so that the clipart image would be in front of the banner.
It's easy to re-stack the layers. Select the object that you want to move up or down in the stack. On the Drawing Toolbar, choose Draw then Order then either Send to Back or Bring to Front. You may have to do it 2 or 3 times to get the layer to show completely (each time you do it, the layer only moves up or down one level).
I use this Powerpoint function on every project I do, including making my own wine labels.
- Grouping Now that you have all of your layers built, it is helpful to group them together so you can easily move the whole label at once.
Hold down your mouse and draw a huge box around the entire label you just created. This will select all objects within the label. On the Draw Toolbar choose Group. Now when you click anywhere within the label, all the objects are selected. You will find yourself Grouping and Ungrouping (also on Drawing Toolbar) repeatedly as you add more to your project.
Copy and Paste
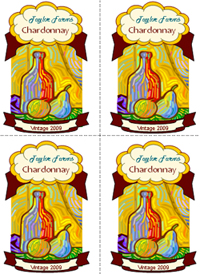
Okay, now you have one label that has been grouped in the upper left quadrant. It is time to copy and paste it into the 3 other quadrants.
Click anywhere in the label and because it has been grouped, everything will be selected.
Choose copy and paste 3 times and move the copies into position. The grid lines you turned on before will really help you line everything up.
Print, Cut, Stick and Spray
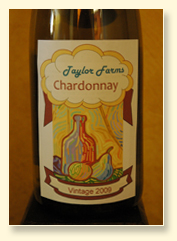
Load the printer with Full Sheet Label Stock usually face down. Print as many labels as needed.
If you have one, use a paper cutter to trim the excess paper from around each label. Each final label should be no bigger than 4 inches tall and 3 inches wide.
We recommend waterproofing your labels after cutting them. Try using Krylon Preserve-It Spray and allow it to dry for 15 minutes.
Remove backing, adhere labels to bottles and admire your own wine labels!
Option 2: Make Wine Labels On-Line
Rather than create them on your computer, you can easily use an on-line service to make your own wine labels for $.50 to $1.17 per label, depending on how fancy you get.

We recommend MyOwnLabels.com, not only for making your own wine labels but also for creating your own personalized wine hang tags, coasters, CD labels, notecards and bags.
The process for making your own wine labels is so simple:
- Choose a style from 20 options
- Choose a label shape
- Choose a color scheme
- Input label text
- Input quantity
- Consider additional options
- Monograms (no extra charge)
- Add Your Own Art
- Request a Font Change
- Request a Special Color
- Check out via on-line cart
- Receive wine labels in mail
- Adhere to bottles!
Important to note:
- FREE SHIPPING for U.S. orders over $50
- Order more and save 10% - 40%
- There is a one-time $10 text charge
- Free proof on all orders over $50
As seen on the MyOwnLabels.com website, you can expect:
Beautiful designs, the highest quality, careful custom styling of your label, the finest paper and printing, a commitment to getting it to you on time, plus excellent customer service means your order will look great and arrive exactly as promised.
Even though on-line labels are a bit more expensive, you may find that your time is worth it and the quality of the labels is sure to impress.
Click here to check out the MyOwnLabels.com website.
Other Wine Related Links


Thoughts? Questions? Opinions?
Have your say about what you just read! Leave me a comment in the box below.